


For many that engage in novel writing or any writing for that matter, Scrivener is a well-known program. It’s been around for quite a while and has served many of us well. With its availability on both Mac and Windows (as well as Linux for a limited time), pretty much anyone with a desktop or laptop computer has access to it. However, despite its reputation, Scrivener isn’t perfect and it has its share of flaws. The lack of proper cloud support is one of my greatest gripes.
However, I won’t spend ten paragraphs of eloquent prose bemoaning the lack of cloud support in the year 2017 (although I really feel like I could). Instead, I’m going to show you have to work around this deficiency and make use of cloud services anyway, thereby allowing you to continue to use Scrivener in the era of the cloud.
Why the Cloud?
First of all, why is the cloud important? Although the reasons may be different depending who you talk to, for me one of the reasons is about portability. What I write at home on my laptop, I need to be able to edit on my phone or tablet when I’m away from my computer, without having to worry about copying files back and forth. Cloud services can work as that intermediary between my laptop and my mobile devices.
If you have iOS, your problem is already solved to some extent. These days, Scrivener has a native iOS application that lets you write and edit on the go and then sync with your desktop. Marvelous, if you’re an iOS user. I’m not.
Since I’m an Android drone through and through, I, therefore, have had to look for other solutions. This post will delve further into the solution I have found to work for me. Hopefully, at the end of the day, it will also work for you until a native Scrivener app is released for Android (they’re “working on it”, they say).
What you need
To make this work, you need three things.
Scrivener
First things first. If you don’t have Scrivener, go to the website right now and check it out. They usually have a free trial that lets you try before you buy. Here’s the link:
https://www.literatureandlatte.com/scrivener.php
You’ll also need a story handy and readily configured. Use an existing one or use the built-in wizard to create a new story.
A Cloud Account
If you’re online these days, it’s likely you already have a cloud account, whether it be OneDrive from Microsoft, Dropbox, Google Drive or one of many other similar services. The important aspect about my particular workaround is that you need a cloud account that will sync files from your computer, files that then will be accessible from a mobile device instantly. Although I have used all of the above (plus many others), I’ve found Dropbox to work the best.
If you don’t have a Dropbox account, you can use my referral link to sign up. Follow all the necessary steps to setup your local sync folder on your computer as described in the installation process.
An Android Text Editor
The final link in this puzzle is the Android app. You need an app that will allow you to connect to your cloud provider. In my particular case, I’d recommend an app I’ve been using for a while now, JotterPad (read me thoughts on JotterPad here: The Tools of A Writer – Writing On The Go With JotterPad). Of course, any other text editor that can edit TXT or RTF and connect to your cloud service of choice will do as well.
Note that JotterPad requires you to pay for the “premium” option for the Dropbox option to be available. I’d recommend you do it and skip out on one of your Starbucks brews for a day. If you’re serious about writing, it’s well worth it.
The Next Steps
Once you have the three pieces of software, you’re ready to get to work.
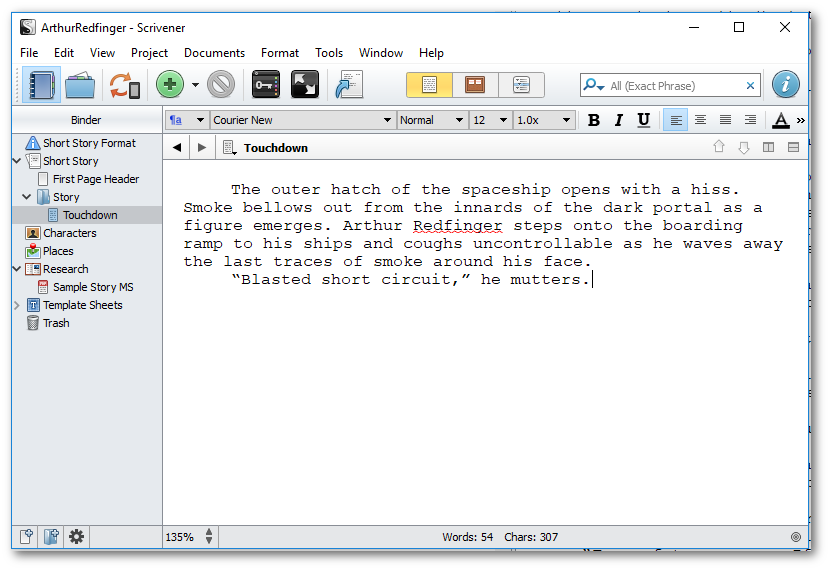
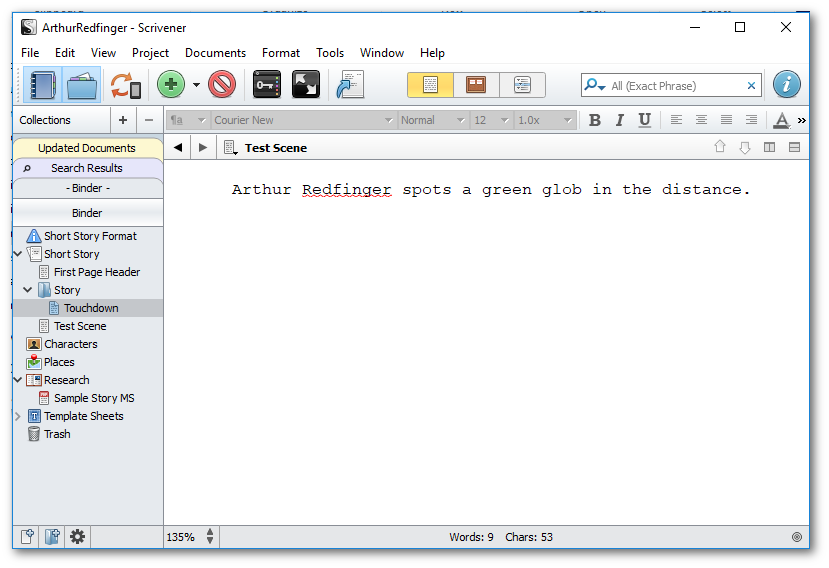
The first step, start to write your story. For the sake of this post, let’s imagine you’re writing a story about Arthur Redfinger and The Green Alien (what actually happens to Arthur is, of course, of no consequence for the purposes of this post). Below, Arthur has just landed on an alien planet. The first steps of Arthur Redfinger’s adventures!
To be able to edit Arthur’s adventures on your Android device, you first have to sync the contents of your story with an “External Folder”. You can see the menu option below.
Note: “Sync with mobile devices” is not an option you want to use unless you have the iOS version of Scrivener, in which case there is little point in reading any further. None of the below stuff is likely to be relevant.
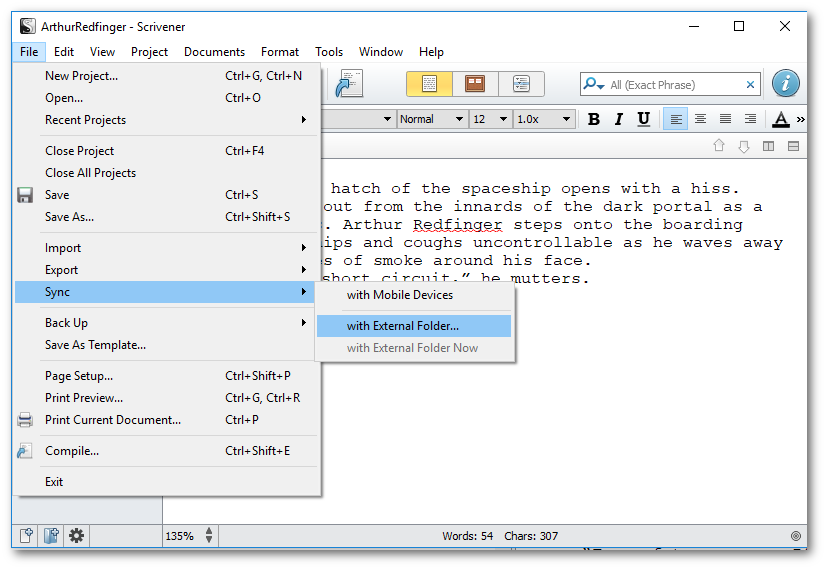
Before your first sync will happen, you will need to configure a few things, such as where the files will be saved, what format and so on. So, after selecting Sync > with External Folder as shown above, the following screen will appear:

At the top, you select the path of sync folder. It is important that this folder is within your Dropbox sync folder (or corresponding folder for other cloud services) for the files to be available on your Android device.
Also, change the Format for external Draft files option from RTF to plain text. All other options can be left alone. Then click save.
Next, you’re actually going to sync your files with your Dropbox folder. Simply select Sync > with External Folder Now and you’ll be all set.

Now, you’re ready to shut that computer down, grab those car keys and find the closest coffee shop, Android device and Bluetooth keyboard in hand (the keyboard is not necessary but it does make typing much easier and much faster).
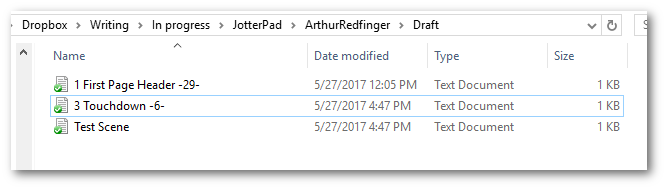
Order your coffee, tea or whatever your favorite brew is, find a table in a corner and setup your keyboard and device. Load up JotterPad and locate the folder you selected to sync your files to. It should look something like this (note that I’m using a JotterPad Beta so actual visuals may vary somewhat):
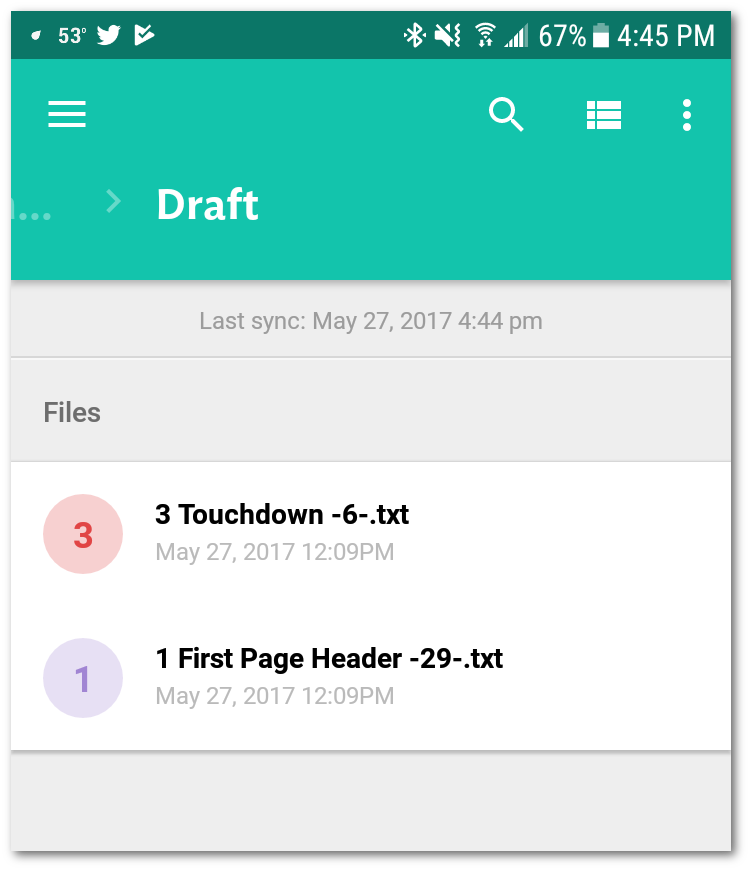
The top file is the existing story you started writing while the bottom one is another template-generated file that you can also see in the file structure in the first Scrivener screenshot above.
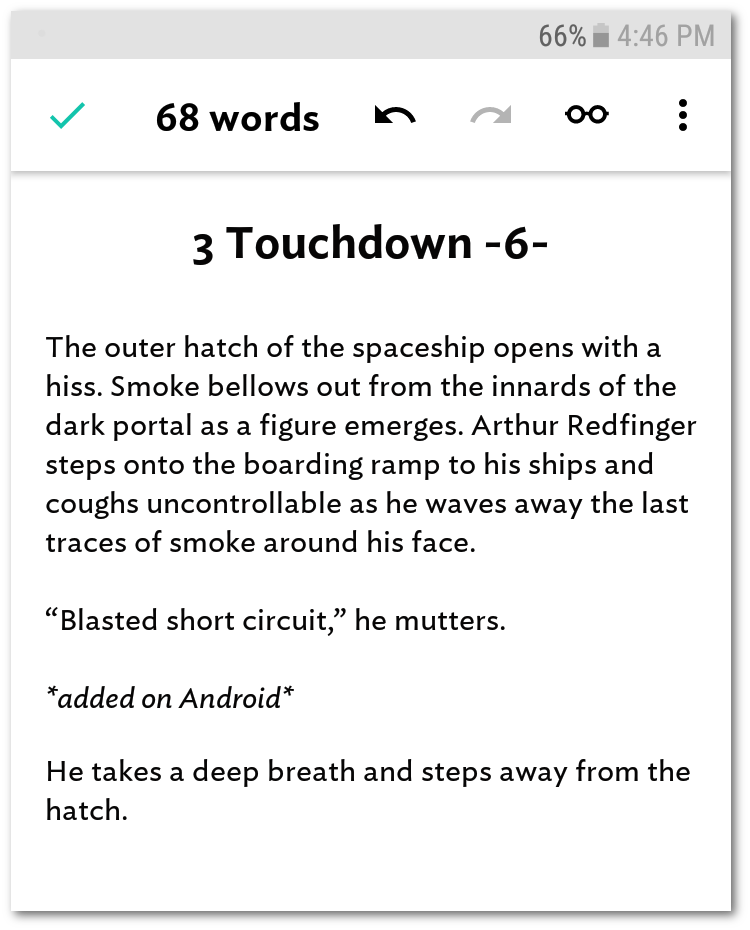
Tap into the file that contains your story. Type away! For demonstration purposes, I only added two new lines, as seen below.
When you’re done, save and return to the file listing screen. Oh, but wait! You just had a great idea for a new scene. Quick! Create a new file in Jotterpad and jot it down.
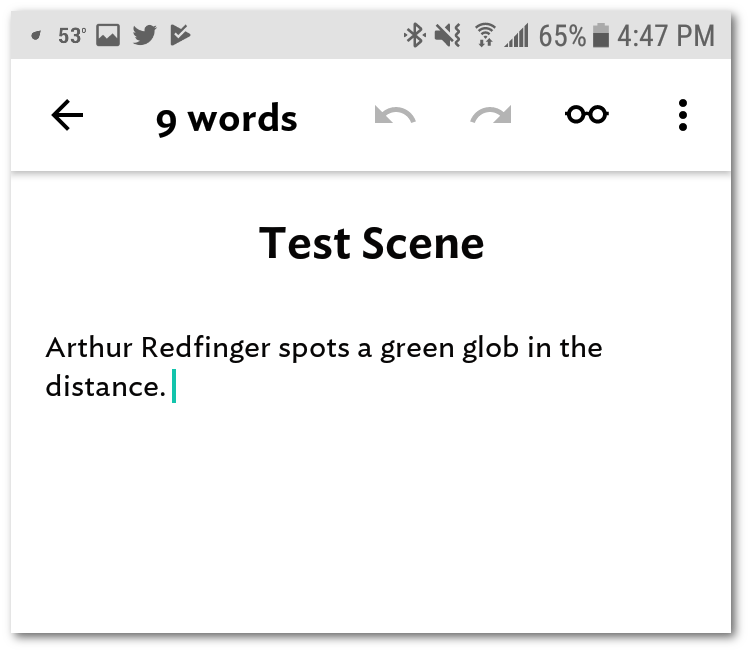
Yes, there we are, the mystery of the green glob. Save the file and you’ll have something like this in the file listing in JotterPad.

Well, would you look at the time? It’s time to head home. Collect your things, throw away the garbage and head home. Turn on your computer and open up your story in Scrivener.
Note: before you do anything else, give your computer a few minutes to sync all changed Dropbox files. Usually, this seems to happen instantly but just in case. In fact, verify the files have synced to your Dropbox folder and that you see the same ones on your computer as you did in JotterPad.
When you have verified that the Dropbox sync is complete, click Sync > with External Folder Now in Scrivener.
Once the operation has completed, you should see something like the below screenshot. Note that your mobile writing appears as it did on Jotterpad (minus any markdown).
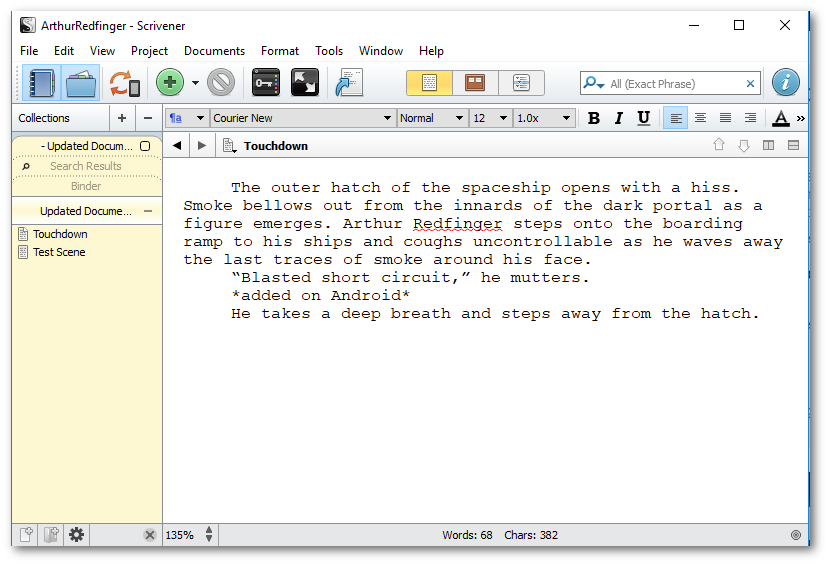
You should also see the fantastic new scene you added at the coffee shop.
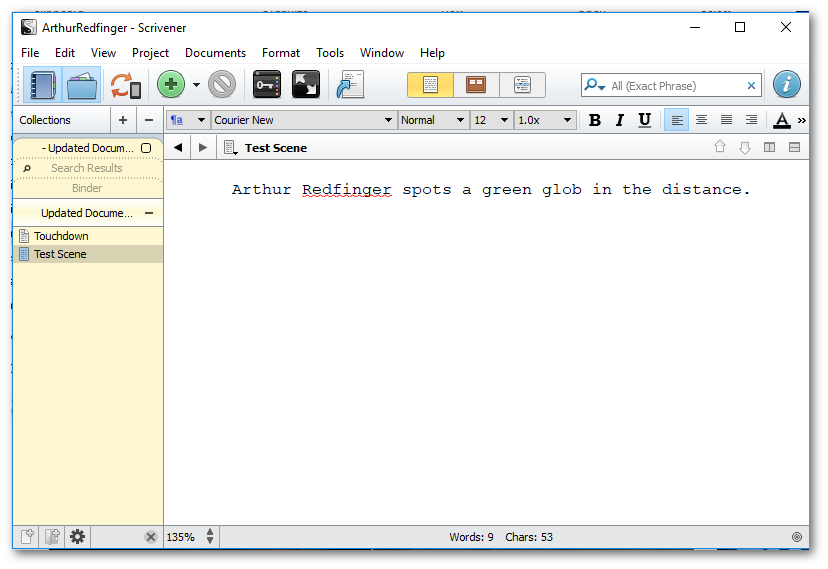
If you click back to your regular Scrivener binder, you should also see your new scene added to the list of others in the folder structure. In the case of the below screenshot, the Test Scene is right below Touchdown.
There you have it. You have written a story in Scrivener, used Dropbox to sync with Android, added to your story with JotterPad and then used Dropbox to sync with your desktop and Scrivener.
Conclusion
As you can see, the process is actually relatively simple. I found that once I used it, the only thing I really wish was present was an auto-sync option in Scrivener that would sync any changes when the story was opened. Otherwise, the whole operation worked as a charm.
As I hope I made clear, the cloud provider and the text editor really can be any other software solution that can do what I’ve described above. It doesn’t have to be Dropbox and JotterPad. Nor is this solution exclusive to Android. It could really be used for a variety of solutions. For example, finding a way to sync with Google Drive would be perfect for those that use Chromebooks to write on the go. I just haven’t explored Google Drive’s capabilities to be able to tell whether that’s possible or not. This solution could likely also be used with other iOS applications, should you not have the desire to actually use the iOS version of Scrivener.
If you end up trying the above solution, I’d love to know what you think. I’d also love to know what other software combinations you have found that will do the same. Leave a comment below with any such fun information. Oh, and if you have a good story you have written using this method, I’d love to read it 😉


Great article. I’ve been chuffed for a while that there is no Scrivener for Android. My writing is all automatically saved to Google Drive, which I can access on my phone, but the Sync to External Folder feature you mentioned renames the files to make them easy to find (they are just randomly numbered in the default Scrivener folder).
The one issue I see is saving the files as plain text (TXT). When you do this, you lose all your formatting in Scrivener (italics, bold, etc.) and have to put it back in it later. I prefer to save it as rich text (RTF) to retain the formatting, so I did a little experimenting.
I created a folder for the files on Google Drive and exported my Scrivener files there as you directed but in RTF format. I was then able to open/edit them on my phone with Google Docs, which retained the formatting. However, because Google Docs converts the files to its own format for editing, you do have to use its Share and Export feature to reconvert them to RTF when you are done.
Then, just follow your steps to have your changes (and new files) show up in Scrivener on your PC.
With this modification, this is going to be a game changer for me as long as I remember to sync after each writing session on the PC 🙂 Thanks so much!
Excellent point on the formatting portion. I rarely do formatting for my own writing in Scrivener so I didn’t even think about that. I have to check and see whether JotterPad can open RTF files….since I know it can export as RTF. Either way, great follow-up from a Google Drive perspective!
Thank you!
So is the main reason for enabling the “sync with external folder”, rather than just placing your Scrivener project in your Dropbox folder to start with (which means it’s constantly synced) so that you get a friendlier method of browsing the files? Folders and files named more clearly, rather than just being listed in a single directory?
Partially. This isn’t a replacement for placing your Scrivener project on Dropbox. You should be doing that anyway if you use Dropbox. It’s to make it easier to access the files, like you said. After all, if I’ve got hundreds of files, it’s easier to find what I need to edit when I can look at the full name rather then opening 91.rtf to see what’s inside.
Yeah that was my experience when I tested this out today. It certainly improved things however I think I’ll still just have to leave any ideas of being able to work on my Scrivener work on the go since the folder structure is missing and for me that’s a deal-breaker. Hopefully the L&L guys will be able to improve this in the new version they are working on as cloud-working is such a vital modern of the modern work or creative environment.
I agree, it’s definitely not a perfect solution absent a native Android version. Last in checked they said it’s coming but it’s absence from the Scrivener 3 announcement was concerning. One option is to try to try a different app, unless you’re too heavily invested in Scrivener. Ywriter6 is an excellent option and an Android app is currently in beta that uses Dropbox or Google drive as the cloud connection. Even at this early stage, it works very good. It’s actually quite awesome to write something on my phone and be able to pick it up seamlessly on my laptop at home. I’m writing one of my current projects using this solution as an experiment.
I’m so annoyed that they haven’t got an Android version, to have had an iOS version out and not even able to give an estimate is ludicrous nowadays. Thanks to you I can get some work done on the go now!
Glad I could help. If you run into any odd things with this process, don’t hesitate to share it here.
Very clear and straight forward… thank you, thank you, thank you
I’m glad it was helpful!
I am so glad I found this article. I’ve been exporting Scrivener files to .doc, then cutting and pasting them back in later. What a hassle! It’s much simpler with your instructions. And Scrivener DOES automatically sync my updates now. Woo hoo! Edits here I come! 🙂
I’m SO glad it was helpful!
I think I’ve read through this article five times now, as well as everyone’s comments, but I can’t get this to work. I’m using Google Drive and JotterPad, but when I try to find the scrivener file in JotterPad after it finishes syncing, the draft folder just says that there are no text files available. When I edit it in Google docs the edits I make do not appear in Scrivener.
Hey! Like I mentioned in the post at the time, I hadn’t explored Google Drive. Last I checked, the Scrivener app creator recommends AGAINST using Google Drive because it treats text files differently than other cloud services. I’ll research this a bit further tonight and update the post accordingly.
Wow! Thanks a thousand times, that helps a lot!
I’m glad to hear it! 🙂
Thanks. This was very useful. I will try it out over the next few days and see how it goes. I don’t mind losing the formatting since I am used to system text. Besides, formatting doesn’t matter to me on a first draft and Scrivener handles formatting, on export, independent of the in-editor formatting.
As for the solution I’ve been using up to now: I already use JotterPad on my Android and love it since it recognized txt files and uses material design along with having a word count at the top (a must). On PC/Windows, I use Atom(v 1.21.1) with a few packages installed to allow for a sortable document tree and a word count. Essentially, I made Atom work like Scrivener in all ways important to me for a first draft (so no exporting, formatting or statistics). My goal, after all, is the first draft. Everything after that can be handled in Scrivener. For those interested, the Atom packages are tree-view-sort (by hex-ci), since I like to sort by modify time to help me remember what section(s) I last worked on, and wordcount (by nesQuick) which adds a word count feature and a word goal.
Justin, thanks for sharing! It’s always interesting to see how others come up with their own solutions 🙂
Thanks for the article. When I follow these steps, everything seems to work but I end with a read only copy in Dropbox (and OneDrive, I tried both) and when I save a copy in order to edit it, the changes from that document don’t sync back to scrivener. Is that a known issue or did I miss a step? Thanks in advance for any assistance you can give.
At what point do you end up with the read only file? After which step in the process?
Have a great day Mattias and readers 🙂
That was a really helpful article. Thanks!
what is the impact of that?
Thank you Mattias (and Janell). A very well written (and even humorous) tutorial! I absolutely love Scrivener but recently required and android device and have been looking for ways to sync. Thank you Janell for pointing out the you can share/save as rtf with Google Docs. I couldn’t believe there was no “save as” function, but now I’ve found it. Thank you both and happy writing!
Glad to hear you figured it out!
Mir hat der Artikel leider nicht geholfen, denn alle meine Leerzeilen und Titelformatierungen wurden gelöscht, das ist sehr ärgerlich.
—–
Unfortunately, the article didn’t help me because all my blank lines and title formatting were deleted, which is very annoying.